Adding an Image - Instructions
Customized Jewelry - How to add an image
TIPS for designing your own jewelry.
Leave room around the edges.
Make Text as dark and as big as you can.
Keep your designs simple.
Remember, you are working on a very small piece of jewelry. What you see on the screen will need to fit on a 15mm to 22mm piece of jewelry.
All jewelry being designed is displayed in black and white even if 14K yellow gold is chosen.
If you are designing an Embossed Piece of Jewelry, please use the grey scale images. Please use white text.
Instructions for Personalizing Jewelry
Add an image:
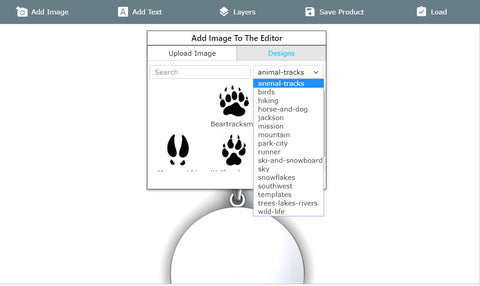
Click on "ADD IMAGE". On the Add Images to the Editor Menu look to the right and click on DESIGNS and look for a drop down menu A-Z IMAGE LIST with several categories in the drop down list. Click on the image to add it to your jewelry design. You may add as many items as you would like.

You may use the handles on the image to rotate, resize, duplicate or remove. The buttons below the item offer styling (most options not applicable because all images must be black and white - you may need to use invert to convert an image from dark to light or light to dark), transform - allows you to flip the image or center it, sizing - allows you to size your image. (this is similar to the handles provided on the image. Both allow you to size)
Layers:

If you need help with layering, click on the "LAYERS" tab and click on the image to the left of the title and slide to move to another spot. The images on the top of the list are the top layers.
Saving and Loading Images:
IT IS RECOMMENDED THAT YOU SAVE YOUR DESIGNS AS YOU GO IN CASE YOU LOSE YOUR DESIGN.

To save a design, click on SAVE PRODUCT on the Design Menu - You will be required to enter a email address and then a title for your design. When you want to load your design back in, click LOAD. Designs are saved on the product they were created on and cannot be brought up on another product.
Other Design Tool Helps:

Some helpful tools are always available at the bottom of the screen.
UNDO
GRID ON/OFF
PREVIEW LIGHT BOX
RESET
REDO
WANT YOUR OWN IMAGE?
If you do not see the clip art you need, upload your own image. It must be simple black and white with no shadowing. NO PHOTOS. If in doubt, send us your design and we will tell you if we can make your image work for your design.

In ADD IMAGE - choose UPLOAD IMAGE and CLICK OR DROP IMAGES HERE.
Please make sure your image is black and white and simple. Vector Images or clip art images are the best. Do not include images that have shadowing or are complex. NO photos. Simple is best. Complex images will require a set up fee.
If you question if your image will work, please send us a copy of your image and we will let you know if there is a set up fee. Simple images do not require a set up fee.
PLEASE DO NOT INFRINGE COPYRIGHT LAWS. We reserve the right to refuse to use images or text that is distasteful. If your image will not work, we will refund your money and send you an email explaining what we need to change to make your image work and set up fees.
DELETING AN IMAGE
Use the garbage can attached to the image to delete an image. Images can also be sized, duplicated and rotated by the handles attached.
IF YOUR CHANGES ARE NOT WORKING, TRY REFRESHING OR CLEARING YOUR CACHE IN YOUR WEB BROWSER.